 by Maggie Mueller
Updated On Aug 20, 2024
Published On Mar 19, 2024
Basic iPhone Tips Ideal for Newbies
by Maggie Mueller
Updated On Aug 20, 2024
Published On Mar 19, 2024
Basic iPhone Tips Ideal for Newbies
So, if your new iPhone gets stuck on the software update screen during setup, there's no need to panic – it can be fixed! We have provided a unique solution, distinct from others, that you can follow to address the issue of the new iPhone setup being stuck on the update screen.
The main reason why many people encounter the issue of a new iPhone setup getting stuck on a software update is likely due to choosing to transfer data during the 'Transfer Your Apps & Data' step in the setup process and then proceeding to update iOS.
This action can prolong the setup time beyond expectations. However, most users resolve the issue by updating the device first and then transferring the data. Although Apple hasn't provided a clear explanation, in the following content, we will show you how to fix the issue in five steps.
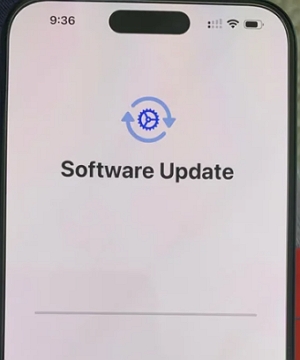
Picture source: iPhone 15 Pro Max stuck on software update screen
When encountering a situation where your iPhone's software update is stuck, it can be frustrating and may lead to uncertainty about whether to wait or cancel the update. If the update remains stuck for an extended period, consider restarting or force restarting your iPhone and then try setting up your new device by following the next five steps.
Forcing a restart on an iPhone can be useful when the device gets stuck on the software update screen for an extended period. The steps to force restart vary depending on the iPhone model. Here's a guide for common iPhone models:
For iPhone 8 and later (including iPhone SE 2nd generation):

For iPhone 7 and iPhone 7 Plus:

For iPhone 6s and earlier (including iPhone SE 1st generation):

After the force restart, your iPhone should restart now.
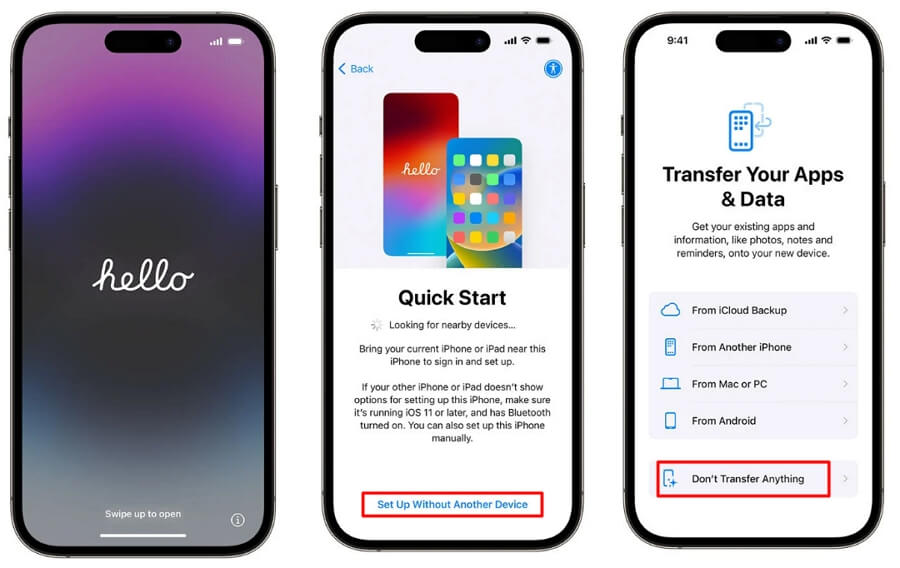
According to Reddit users, it is recommended to update your device before initiating the data transfer. Therefore, the second step involves setting up your device without transferring apps and data, and then updating iOS from Settings.
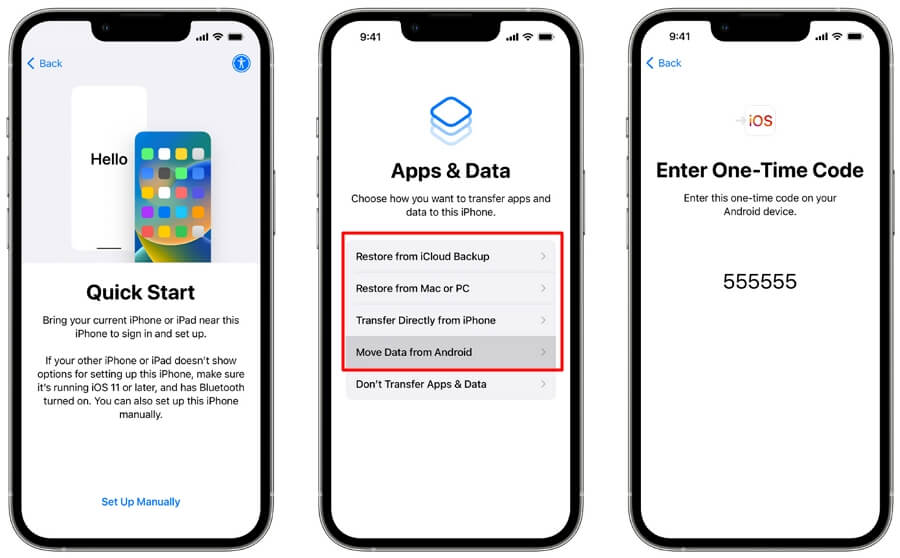
When your iPhone restarts, continue the setup process step by step until you reach the 'Transfer Your Apps & Data' screen. Choose "Don't Transfer Anything." This way, Apple won't require you to update iOS as part of the initial setup.
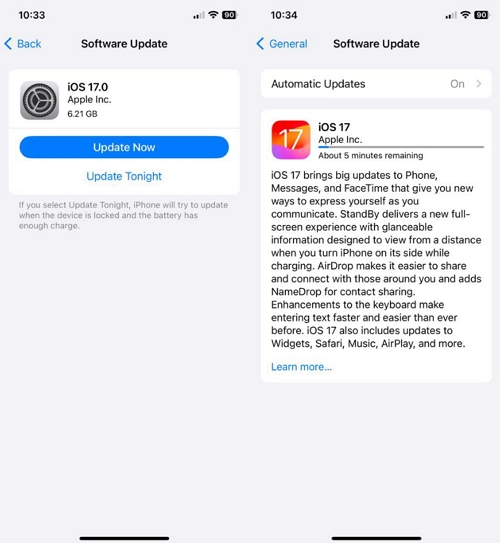
Once you access the home screen of your iPhone after setup, go to "Settings" > "General" > "Software Update," just like you would normally. If an update is available, follow the on-screen instructions to download and install it.
If your iPhone still gets stuck when updating using OTA, you can alternatively use a computer to update your device via iTunes or Finder.
To update your iPhone using iTunes or Finder, follow these steps:
Using iTunes (for Windows and macOS Mojave and earlier):
Using Finder (for macOS Catalina and later):

After the update is complete, your iPhone will restart, and you'll be using the latest iOS version.
Once your iPhone has been updated to the latest version, you will need to perform a factory reset on your device if you want to restore data from an old backup or from another iPhone to your new device.
To erase all data and settings on your iPhone, follow these steps:
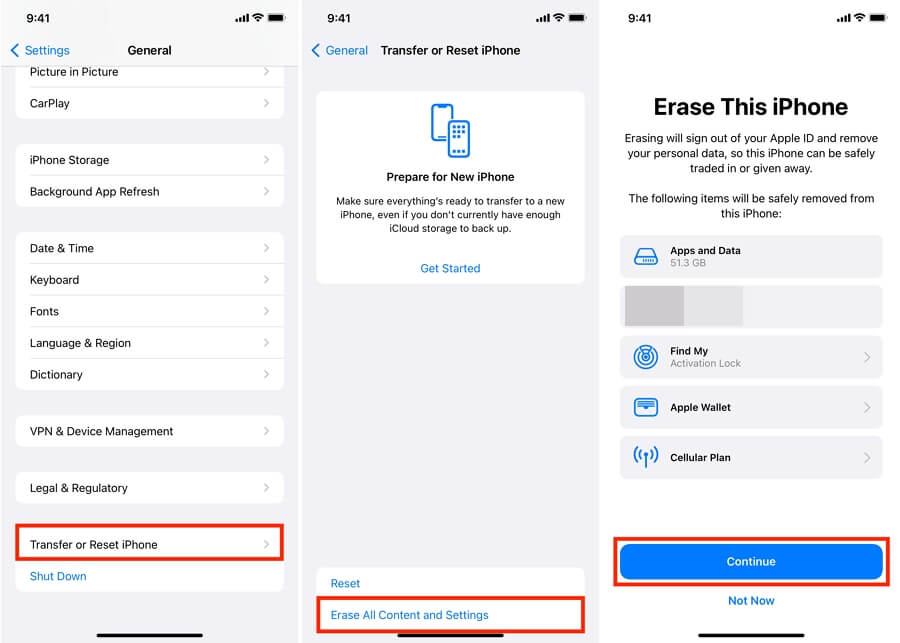
After your iPhone is erased, you can now choose how you want to restore or transfer your data from your old device to your new device when you reach the 'Transfer Your Apps & Data' screen during setup without getting stuck on the software update screen. You can use an iCloud backup, a backup made from your computer, directly from another iPhone, or move data from an Android device as you prefer.
In some cases, software updates may take longer than usual due to factors like a slow internet connection or server congestion. If you decide to wait for the software update to complete, the following tips can help you navigate the process smoothly.
When a new iOS update is released, users worldwide rush to update their iPhones to the latest version. This surge in activity can sometimes overwhelm Apple's servers, causing delays.
If your iPhone remains stuck on the software update screen for 10 minutes, there's no need to panic. Just be patient during the update process. It's normal for an iPhone to experience a temporary freeze while updating to a new iOS version.
Next, it's crucial to ensure that your internet connection is stable and fast enough for the update. Use the Speedtest app by Ookla or Fast by Netflix for a quick speed test.
Make sure your device is connected to an active WiFi network. If the download speed is 5Mbps or higher, you have a good connection for downloading the iOS software.
You can also use internet browsers like Safari and Chrome to check if your phone has a working internet connection. If you're using a VPN on your device, disable it either through the VPN app or via your iPhone's settings.
Additionally, consider restarting your WiFi router, as this might help resolve the issue. Switching to a different WiFi network can also provide a quick fix.
If your iPhone's battery is running low, it may cause your device to get stuck during the software update. If the battery percentage is below 50%, the update may not even initiate. Ensure your iPhone is charged throughout the updating process.
Getting stuck on the software update screen with your new iPhone is a common challenge, especially for long-time Apple users. However, there's no need to worry. The potential solutions have been thoroughly detailed above. By following these steps and tips, you can ensure a smoother experience with your new iPhone setup.
