Imagine you got your hands on a second-hand iPhone, and you've been looking forward to being part of the Apple crew for a long time, but when you open the iPhone and prepare to set it up, you realize the device is stuck in the iCloud Activation Lock, and you don't have the password!
Then you should have heard of iCloud DNS bypass. This article will show you what iCloud DNS bypass is, how it works, and whether it works or not to get past the Activation Lock.
Before we get into what "iCloud DNS Bypass" is, let's look at what DNS is. DNS stands for Domain Name System, which is a process of converting readable names into numerical values that a device can read.
Now the DNS Bypass method works by using the DNS to reroute your activation path from the Apple Servers toward a bypass server, allowing you to get your phone authenticated without the need for any credentials.
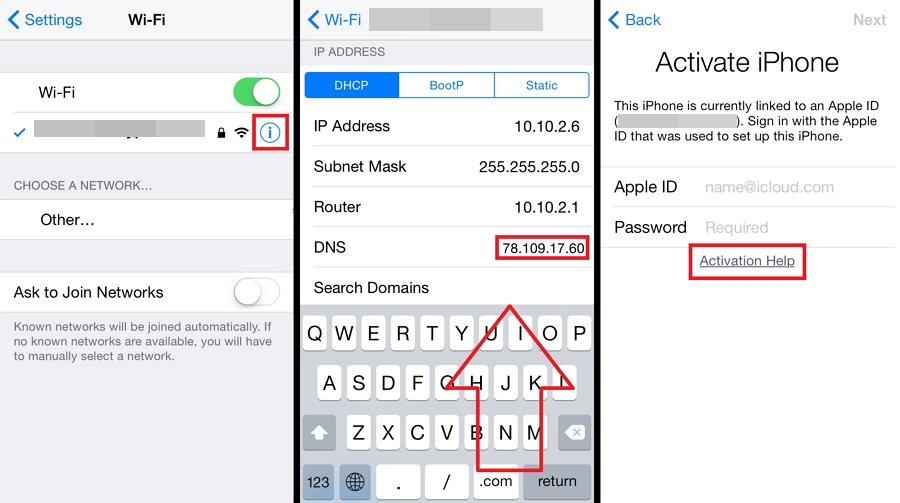
To do this, you only need to head over to your WiFi settings and reroute the IP server path. I know it sounds like all tech-wizarding stuff, but most smartphones allow you to manually enter a WiFi connection, enabling you to edit a DNS pathway.
Once you've made your way to the server, the world is your canvas as apps, gadgets, and the internet will be at your disposal to use as you see fit.
![]()
The iCloud DNS bypass involves changing the DNS settings on your iPhone to redirect the activation server, allowing you to bypass the iCloud activation lock.
Here's a step-by-step guide to help you accomplish it successfully:
Please note that attempting to bypass activation locks may violate service terms and could be illegal. Make sure to use such methods responsibly and consider the legal implications in your jurisdiction.
Since the method above only lets you use some of the apps and features on your iCloud, you might want to consider the bypass 'crash' method for a more effective take.
Beware, you must never reboot your device after this method, or you'll have to do it all over again. Don't make the same mistakes I did.
To crash the bypass, follow these simple instructions:
In my opinion, this method is the best since it lets you access all the features a regular iPhone would have. However, even if you reboot your phone to solve any potential issues, you will have to start from scratch, which can be hectic for many.
Although a DNS bypass on your iCloud can be a great way to unlock your iPhone, this approach has some limitations. You may go in thinking you could get some additional problems sorted out as well, but in reality, that might not happen.
One of the biggest differences between using regular iCloud activation and a DNS Bypass is the feature accessible with each approach. When you log in using your Apple ID and password, you can easily access all the features on the iCloud.
However, I learned through experience that with a DNS bypass, you can only use some specific features, such as the inability to make calls, use cellular data, and take photos. Additionally, once you've bypassed the lock, you won't be able to iCloud from the settings with your Apple ID.
Another issue that many people face is a lack of compatibility. The DNS bypass is perfect for those of you who have older iPhones with an iOS 8 or 10. If you're like me and got newer ones such as iOS 15, or iOS 17, I'm sad to say that this method would probably fail for you.
Another drawback is that using this method means that you have to do all the steps on your own, however these steps are much complicated for novices. If you encounter problems during the process and try to contact the team, you will find that you can't get in touch with them to get help
Since it's not an official way of accessing your phone's iCloud, there is always a risk involved. Even when I was trying it, I know how frustrating it was when it didn't work. Maybe it works or doesn't - you'll have to try it out and find out.
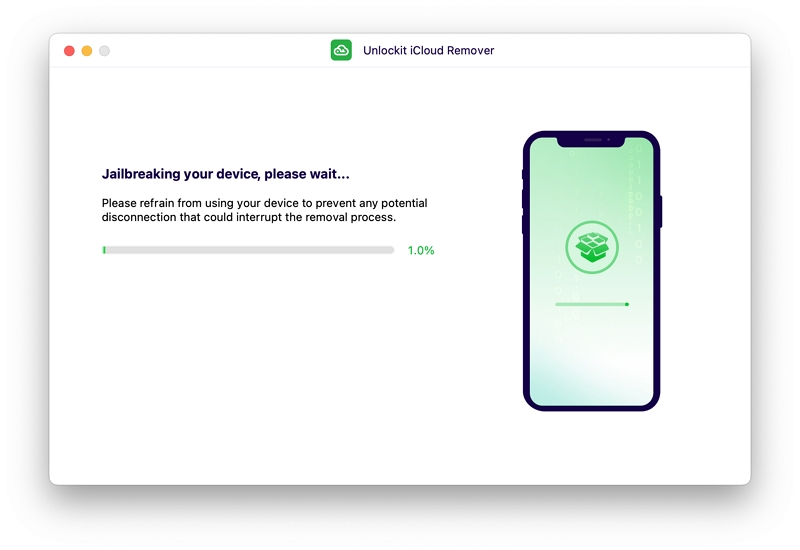
Even though the methods mentioned above have helped many people unlock their devices, chances are it might not work for you. In cases like these, I think it's best to use Unlockit iCloud Remover. It is one of the most effective tools that one can use to unlock the iCloud Activation Lock. The main features of Unlockit iCloud remover are:
You can get the job done by following these easy steps:
Step 1. Download the tool by clicking on the download button and open it up on your computer.
Step 2. Once the tool is up and running, connect your iOS device with the help of a USB cable. As the tool picks up your device and runs, tap the "Start."

Step 3. To remove the lock, your device needs to be jailbroken; however, don't worry, as the program does that for you.
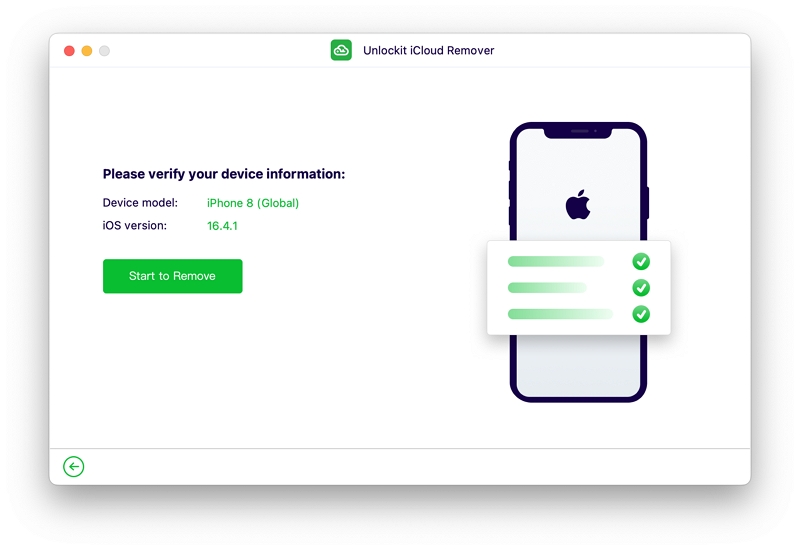
Step 4. After completing the jailbreaking process, the tool interface will show you information relevant to your device. Make sure you have the right device connected, and proceed by clicking the "Start to Remove" button.
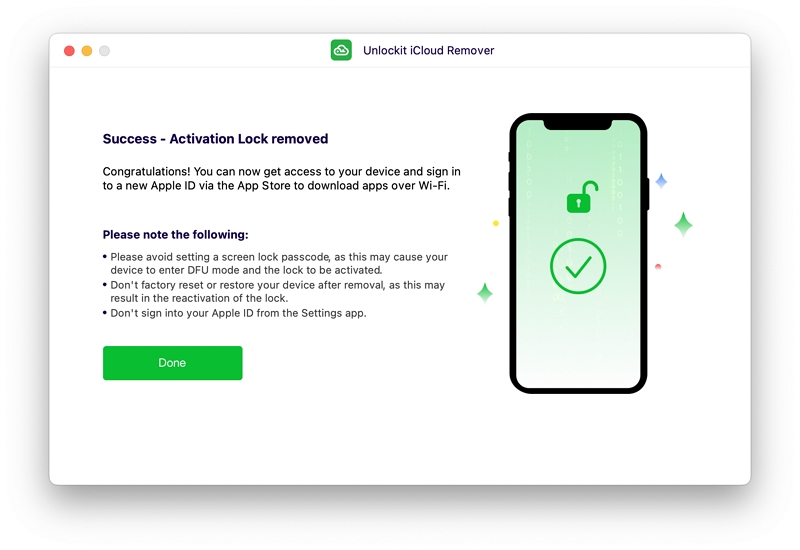
Now sit back, relax, and watch some funny cat videos while the tool takes care of the removal. The removal process only takes a couple of minutes, and after it is done, you can get access to the device again!
I get it; we all know that contacting Apple Support or getting the iCloud credential from the previous owner may be the safest way to get past the iCloud activation lock, but it's also really hectic. So, it's best to try the DNS bypass method that lets you get the job done, all in the comfort of your home and with a potential iced tea in hand.
However, you need to know that this method isn't perfect and has many drawbacks, especially not being able to take selfies with that excellent iPhone camera.
For people looking to not compromise on these features, I strongly suggest you opt for trusted tools like Unlockit, because it is a simple, effective, and highly effective solution that will bypass iCloud activation even if you don't have the Apple ID password. So spending a few bucks on such a service in return for unforgettable memories seems like the right thing to do if you ask me.


Mako is a technical writer with a passion for all things tech. Whether you're wondering about how to fix your iPhone or Android device or trying to get something to work in your settings, Mako is your go-to for professional help. He loves writing, testing solutions, and most of all, making sure his research is factually accurate.