If you forgot the passcode you just set and have entered the wrong one multiple times, you might be wondering how many attempts you can make before your iPhone becomes disabled or unavailable. In this guide, I'll explain how many passcode attempts to unlock iPhone are allowed before an iPhone is completely disabled or unavailable, based on my tests with three iPhones running iOS 15.8.2, iOS 16.5, and iOS 17.4.1.
The number of times you can enter the wrong passcode before your iPhone becomes disabled or unvailable depends on whether you lock the screen between attempts and the iOS version you're using.
If you continue entering the wrong passcode without locking the screen, you'll get more chances to try.
In my test, on an iPhone 7 running iOS 15.8.2, I was able to enter the wrong passcode 22 times until seeing the "iPhone unavailable, try again in 1 minute" message. After that, I had 3 more attempts before the phone was completely locked, making it about 25 attempts in total.
Here's a table summarizing the consequences of failed passcode attempts based on different iOS versions and whether the screen is locked after each attempt:
| Failed Login Attempt (If you don't lock the screen after each attempt) |
What Happens on Your iPhone After |
1st to 21th attempts |
iPhone allows you to re-enter the passcode |
On the 22th attempt |
"iPhone unavailable, try again in 1 minute." |
On the 23th attempt |
"iPhone unavailable, try again in 5 minutes." |
On the 24th attempt |
"iPhone unavailable, try again in 15 minute." |
On the 25th attempt |
"iPhone unavailable, try again in 1 hour." |
On the 26th attempt |
"iPhone unavailable, with no timer." |
On my iPhone 8 running iOS 16.5, I had 15 attempts until the "iPhone unavailable, try again in 1 minute" message appeared, and 5 more tries before the phone was fully locked—so about 20 attempts in total.
| Failed Login Attempt (If you don't lock the screen after each attempt) |
What Happens on Your iPhone After |
1st to 14th attempts |
iPhone allows you to re-enter the passcode |
On the 15th attempt |
"iPhone unavailable, try again in 1 minute." |
On the 16th attempt |
"iPhone unavailable, try again in 5 minutes." |
On the 17th attempt |
"iPhone unavailable, try again in 15 minute." |
On the 18th attempt |
"iPhone unavailable, try again in 1 hour." |
On the 19th attempt |
"Security lockout, try again in 3 hours." |
On the 20th attempt |
"Security lockout, try again in 8 hours." |
On the 21th attempt |
"Security lockout, with no timer." |
On my iPhone 13 running iOS 17.4.1, I was allowed 13 attempts until the "iPhone unavailable, try again in 1 minute" message, with 5 more chances afterward, totaling about 18 attempts.
| Failed Login Attempt (If you don't lock the screen after each attempt) |
What Happens on Your iPhone After |
1st to 12th attempts |
iPhone allows you to re-enter the passcode |
On the 13th attempt |
"iPhone unavailable, try again in 1 minute." |
On the 14th attempt |
"iPhone unavailable, try again in 5 minutes." |
On the 15th attempt |
"iPhone unavailable, try again in 15 minute." |
On the 16th attempt |
"iPhone unavailable, try again in 1 hour." |
On the 17th attempt |
"Security lockout, try again in 3 hours." |
On the 18th attempt |
"Security lockout, try again in 8 hours." |
On the 19th attempt |
"Security lockout, with no timer." |
If you lock the screen after each failed attempt, Apple limits the number of tries. For the iPhone 7 running iOS 15.8.2, locking the screen after each attempt gave me 15 chances before the "iPhone unavailable, try again in 1 minute" message appeared, and another 3 attempts before it was fully locked—about 18 attempts overall.
| Failed Login Attempt (If you don't lock the screen after each attempt) |
What Happens on Your iPhone After |
1st to 14th attempts |
iPhone allows you to re-enter the passcode |
On the 15th attempt |
"iPhone unavailable, try again in 1 minute." |
On the 16th attempt |
"iPhone unavailable, try again in 5 minutes." |
On the 17th attempt |
"iPhone unavailable, try again in 15 minute." |
On the 18th attempt |
"iPhone unavailable, try again in 1 hour." |
On the 19th attempt |
"iPhone unavailable, with no timer." |
On both my iPhone 8 and iPhone 13, I had only 6 attempts until the "iPhone unavailable, try again in 1 minute" message appeared, followed by 5 more attempts before the phone was completely locked—about 11 attempts in total.
| Failed Login Attempt (If you lock the screen after each attempt) |
What Happens on Your iPhone After |
1st to 5th attempts |
iPhone allows you to re-enter the passcode |
On the 6th attempt |
"iPhone unavailable, try again in 1 minute."? |
On the 7th attempt |
"iPhone unavailable, try again in 5 minutes."? |
On the 8th attempt |
"iPhone unavailable, try again in 15 minute."? |
On the 9th attempt |
"iPhone unavailable, try again in 1 hour."? |
On the 10th attempt |
"Security lockout, try again in 3 hours." |
On the 11th attempt |
"Security lockout, try again in 8 hours." |
On the 12th attempt |
"Security lockout, with no timer." |
For device running before iOS 15.2, it's 9 attempts in total before it's completely locked.
| Failed Login Attempt (If you lock the screen after each attempt) |
What Happens on Your iPhone After |
1st to 5th attempts |
iPhone allows you to re-enter the passcode |
On the 6th attempt |
"iPhone is disabled, try again in 1 minute." |
On the 7th attempt |
"iPhone is disabled, try again in 5 minutes." |
On the 8th attempt |
"iPhone is disabled, try again in 15 minutes." |
On the 9th attempt |
"iPhone is disabled, try again in 1 hour." |
On the 10th attempt |
"iPhone is disabled, connect to iTunes." |
If you enabled the data erasure feature when setting up your passcode, you have 10 attempts before the phone automatically erases all data. After the tenth attempt, the data is permanently wiped, and unless you backed up your information to iCloud, it cannot be recovered.
To regain access to your iPhone without a passcode, you can try any of the following methods. The important thing is to avoid websites that claim to unlock your phone in exchange for your Apple ID information—they do not work. Instead, here are some legitimate methods to unlock a disabled iPhone. Let's dive in!
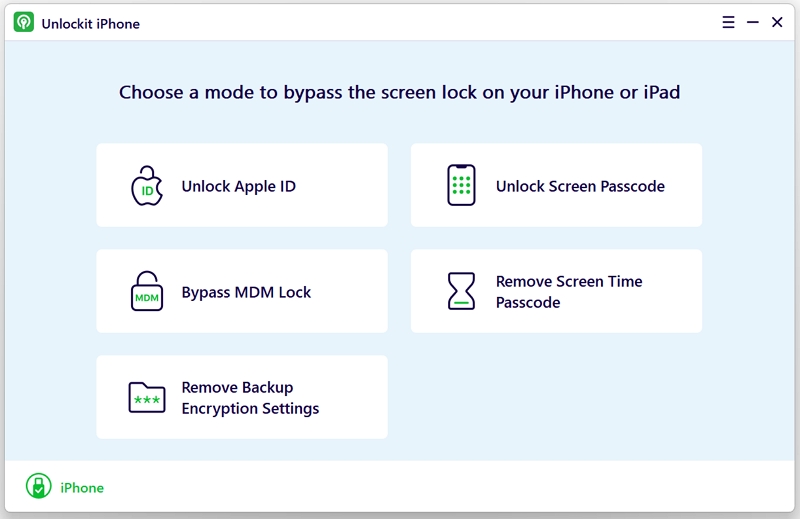
In many cases, the methods to unlock an iPhone without a passcode can be too extreme. Some of us, including me, simply aren't tech-savvy enough to get it right. Such a method can do more harm than good. That's where the Unlockit iPhone comes in. This software is perfect for people that want a hassle-free experience when getting back into their phones.
What sets Unlockit iPhone apart?
Here's how to use it:
Step 1. Download and install Unlockit iPhone on your computer and run it.
Step 2. Connect your iPhone via a lightning cable and ensure a secure connection. Select "Unlock Screen Passcode" from the main screen.
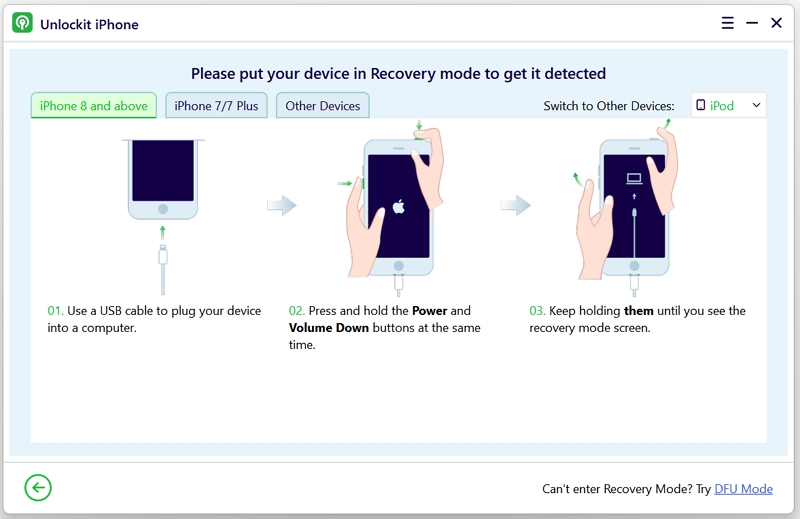
Step 3. Boot your device into Recovery mode.
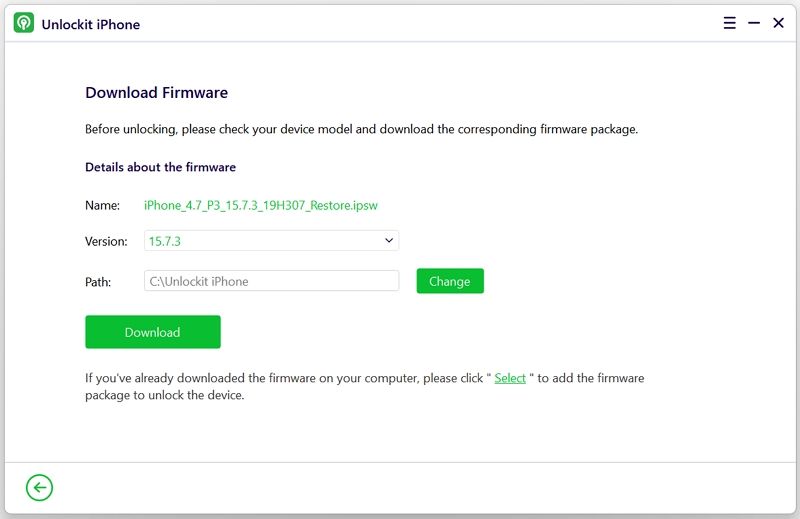
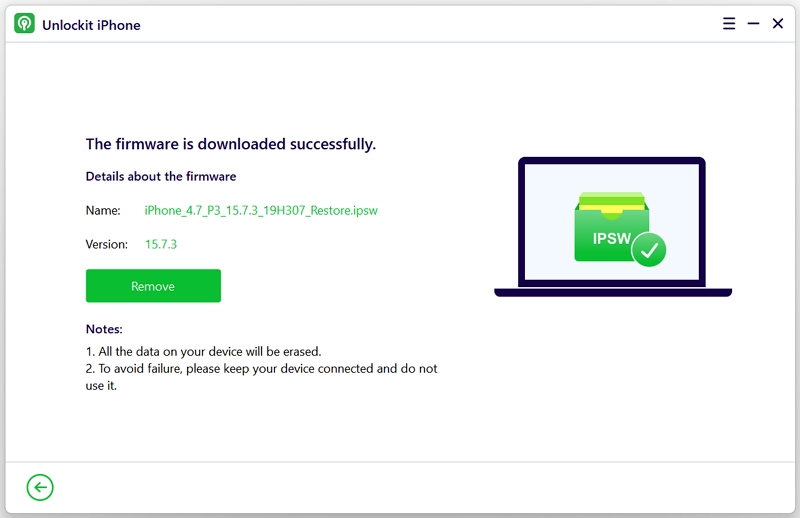
Step 4. Click 'Download' to get the required firmware.
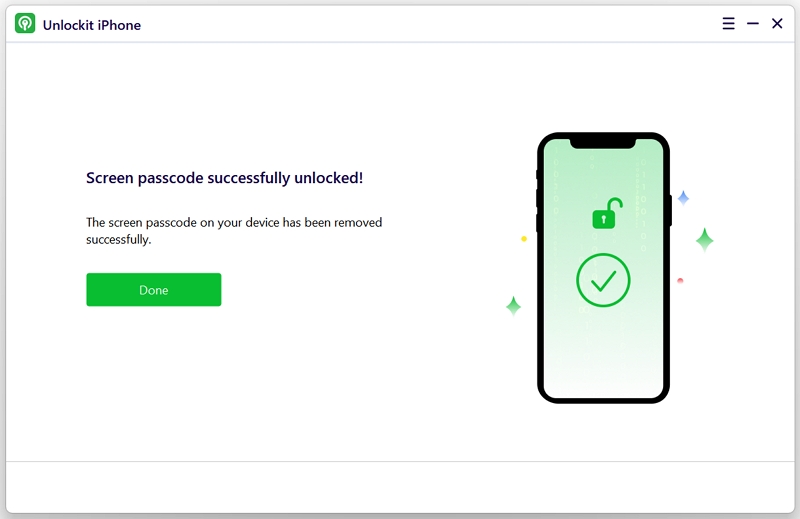
Step 5. Once the firmware is downloaded, click 'Remove' to start the unlock process. Your phone will unlock within minutes, with no further steps required.
If you prefer a hands-on approach and don't mind some technical troubleshooting, unlocking your phone through Recovery Mode is another option.
Here's what you need to do:

If your iPhone was previously synced with a computer, you can use iTunes to unlock it.
Your iPhone will return to its factory settings, and all data will be erased. Note that this method won't work if your computer was not previously synced to your phone.

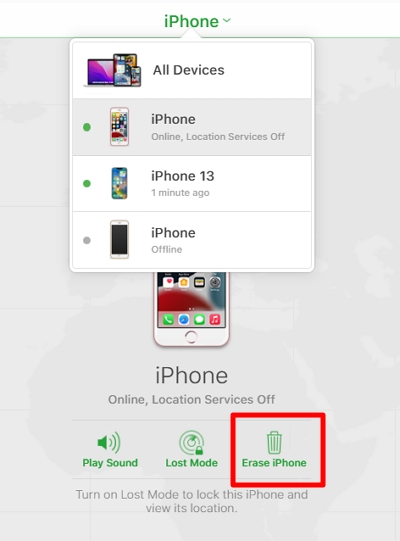
Find My iPhone helps you locate lost devices and it can also be used to remove locks if you've forgotten your passcode or Apple ID.
This method is simple and Apple-approved, but it only works if Find My iPhone is enabled and the phone is connected to the internet.
Here's what you need to do:
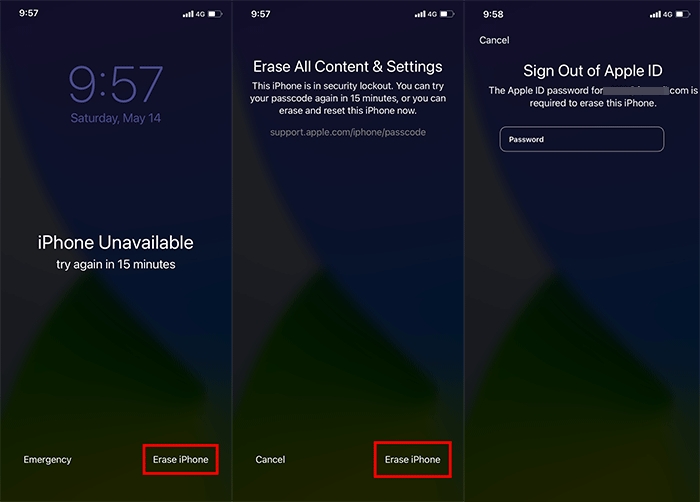
The Security Lockout feature allows you to erase your iPhone after entering the wrong passcode multiple times without computer.
Q1: Can I enable Find My after my iPhone is locked?
No, Find My must be enabled before your phone is locked. Once locked, you cannot enable it.
Q2: What is Apple's most trusted method for unlocking an iPhone?
Apple prefers methods that allow users to unlock their phones themselves. However, using a trusted service like Unlockit iPhone is a great option for non-tech-savvy users.
Q3: How do I check if my iPhone is synced to a computer?
Log into iCloud with your Apple ID and view all connected devices. Both your iPhone and computer should be listed there.
Q4: How can I prevent forgetting my passcode?
Consider using Face ID or Touch ID for easier access. Both are secure and convenient alternatives.
If you ever get locked out of your phone, you now have several methods to regain access. While many of these options require specific settings or may take time, the easiest and most efficient solution is to use Unlockit iPhone. When it comes to your phone, it's always better to avoid unnecessary risks.


Mako is a technical writer with a passion for all things tech. Whether you're wondering about how to fix your iPhone or Android device or trying to get something to work in your settings, Mako is your go-to for professional help. He loves writing, testing solutions, and most of all, making sure his research is factually accurate.