 by J. Robertson Macaulay D. Young
Updated On Jul 19, 2024
Published On Aug 31, 2021
Basic iPhone Tips Ideal for Newbies
by J. Robertson Macaulay D. Young
Updated On Jul 19, 2024
Published On Aug 31, 2021
Basic iPhone Tips Ideal for Newbies
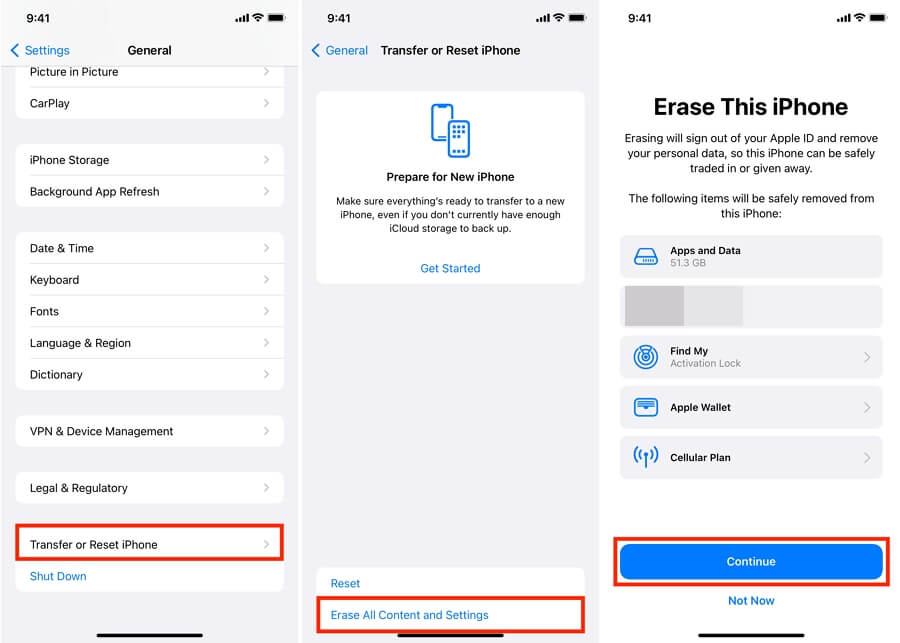
So, you have chosen to erase all contents and settings, perhaps to sell your device or fix a software problem. However, the process has taken more than an hour, indicating that it is stuck.
In this article, we will explore what to do when the reset process on your device fails or gets stuck on erasing all contents and settings. Let's start with why your device seems to be stuck.
There are several reasons why your iPhone gets stuck when you choose the "Erase All Contents and Settings" option, but the five main ones include:
These factors can affect the device's functionality, causing software problems that may lead to it getting stuck after a reset. Here are some solutions to fix an iPhone that is stuck.
If the device is frozen and you can't turn it off normally, a forced restart may help. The process depends on the type of iPhone you have:
iPhone 8 (Plus) and Later Models: Press and release the Volume Up button, press and release the Volume Down button, then press and hold the Side/Power button until the Apple logo appears.

iPhone 7 and 7 Plus: Press and hold both the Power and Volume Down buttons at the same time. Continue holding both buttons until the Apple logo appears.

iPhone 6S/6S Plus and iPhone 6 (Plus): Press and hold both the Side (Power) button and the Home button until the Apple logo appears.

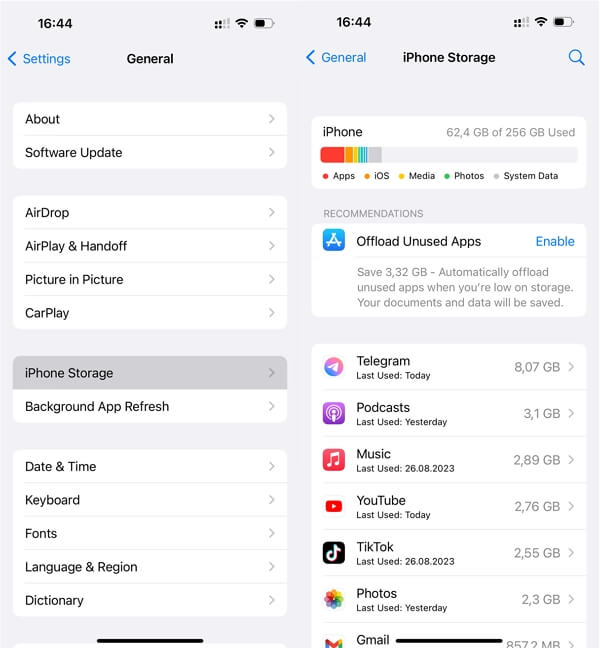
Ensuring your phone has enough free space is essential for its optimal operation. Here's how you can check and free up space on your iPhone before you attempt to erase all content and settings on your iPhone:
Check Available Space:
Free Up Storage:
If a particular app is causing your iPhone to freeze, force quitting the app before trying again.
For iPhones with Face ID:: Swipe up from the bottom edge and pause in the middle of the screen, then swipe up on the app to close it.
For iPhones with the Home Button: Double-click the Home button to open the App Switcher, then swipe up on the app to close it.
Some buggy apps can cause your iPhone to freeze. You'll need to remove the problematic app:
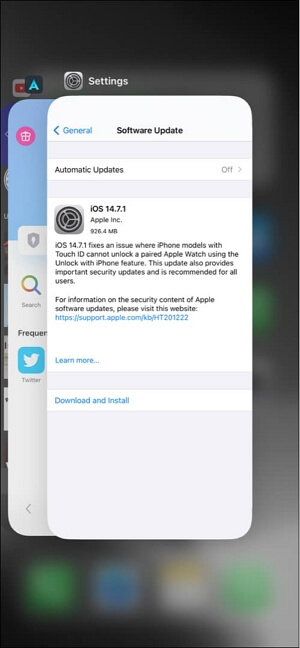
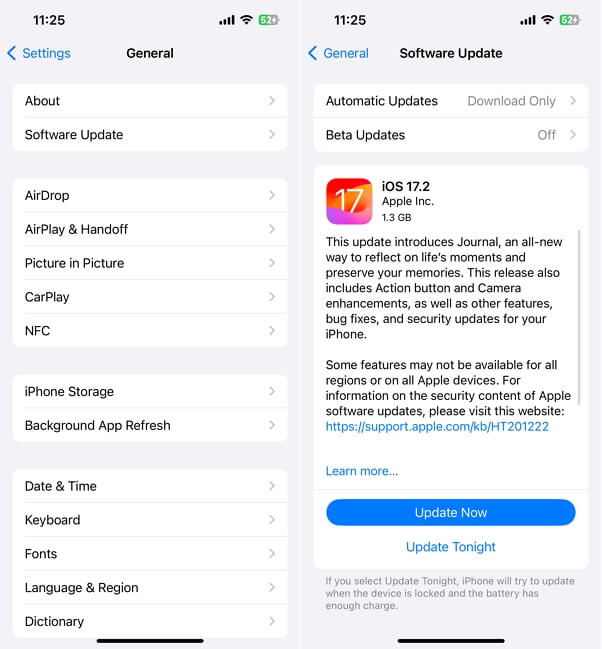
Sometimes, apps need to be updated to resolve bugs that can cause freezing.

A software bug might be causing the 'Erase All Content and Settings' issue. Regular iOS updates from Apple often fix bugs that affect iPhone performance.
By following these above steps, you can ensure your iPhone has enough free space and is running the latest software, which can help prevent and resolve freezing issues.
However, if a forced restart doesn't work or your iPhone still frequently freezes, try using a system repair tool like TinyFix. This tool is designed to fix iPhone freezing, unresponsiveness, or being stuck on a black screen, Apple logo, loading circle, and more without causing data loss.
Here's how to use TinyFix:
Step 1: Download and install TinyFix onto your computer.
Step 2: Connect the iPhone to the computer using a USB cable. Click "iOS System Repair" once the device is detected.

Step 3: Click "Standard Repair" and follow the on-screen instructions.

Step 4: If the program can't detect the device, follow the instructions to put it in recovery mode or DFU mode.

Step 5: Click "Download" to download the firmware package.

Step 6: When the download is complete, click "Fix Now" to start the process. In a few minutes, your iPhone will restart and the issue should be resolved.

If the device still freezes, you can also consider restoring it to factory settings via iTunes or Finder. This will erase all the data on your device, so ensure you have a backup available. Follow the steps to factory restore your iPhone using iTunes or Finder:

Restoring the iPhone in Recovery mode can be effective if the device is running an older version of iOS or got stuck after an update.
Step 1. Connect the iPhone to the computer and open Finder (macOS Catalina 10.15) or iTunes (Windows or macOS Mojave 10.14 and earlier).
Step 2. When the iPhone appears in iTunes or Finder, force restart it as described above, but continue holding the buttons past the Apple logo until the "Recovery Mode" screen appears.

Step 3. Choose "Update" in iTunes or Finder to reinstall iOS without erasing data.

DFU (Device Firmware Update) mode is a last resort for fixing stubborn iOS problems. It will overwrite the software and firmware with new code.
Connect the iPhone to the computer and follow these steps to restore your iPhone in DFU mode;
iPhone 6s, iPhone SE (1st Generation), and earlier Models:
iPhone 7 and 7 Plus:
iPhone 8, iPhone SE (2nd Generation), and Later Models:
Note: You will know you have successfully entered DFU mode if the screen remains black. If you see the Apple logo or the Connect to iTunes screen, restart the process.
Once the device is in DFU mode, follow the instructions in Finder or iTunes to restore it.

If your device is still stuck after trying all the solutions above, contact Apple Support to schedule a repair appointment. If the device is still under warranty, it may be repaired for free.
When your device gets stuck soon after erasing all contents and settings, the first step is to identify the cause. Software issues are usually the culprit if you updated the device right before it got stuck, while hardware issues are more likely if the device was dropped or suffered liquid damage.
Whatever the cause, the solutions above should help fix the device without causing additional problems. However, if you suspect hardware damage, it's best to have an Apple technician examine it.

Mako is a technical writer with a passion for all things tech. Whether you're wondering about how to fix your iPhone or Android device or trying to get something to work in your settings, Mako is your go-to for professional help. He loves writing, testing solutions, and most of all, making sure his research is factually accurate.