 by J. Robertson Macaulay D. Young
Updated On Jul 23, 2024
Published On Dec 7, 2021
Basic iPhone Tips Ideal for Newbies
by J. Robertson Macaulay D. Young
Updated On Jul 23, 2024
Published On Dec 7, 2021
Basic iPhone Tips Ideal for Newbies
Your iPhone's Emergency SOS mode is a valuable feature for various emergency situations. However, some users have reported that their iPhone gets stuck in Emergency SOS mode. This issue prevents you from making any calls except to your emergency contacts, which can be very frustrating.
Here, we explore why this problem occurs and how you can fix it.
The SOS mode on your iPhone, indicated in the upper right corner, means your iPhone isn't connected to the cellular network. When your iPhone is in SOS mode, you can only make emergency calls or texts. Although resolving this issue can be challenging due to factors beyond your control, the following checklist can help troubleshoot the problem:
Ensure you are in an area with good cellular network coverage. Confirm with others around you who have service while you don't.
One of the simplest solutions is to turn off the iPhone and connect it to a charger for at least an hour before turning it back on. However, if you find even after charging, you might find the device still stuck on "Your Emergency Contacts Have Been Notified," proceed to next solution.

Try to toggle Airplane Mode on and off after your device turns on:
Review your Cellular Line:
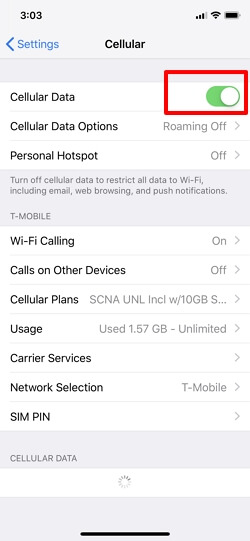
Try to toggle Cellular Data off and on:
If you're traveling internationally, make sure that your have enabled data roaming on your iPhone:
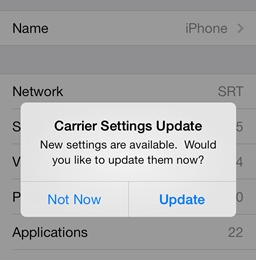
Your carrier might send updates to improve cellular connectivity on your iPhone. To check for carrier settings updates:
If the above tips don't work, try force restarting your iPhone. This method is more effective in resolving software glitches.
For iPhone 6 and 6 plus: Press and hold the power and home buttons at the same time until the Apple logo appears on the screen and the device restarts.

Force iPhone 7 and 7 Plus: Press and hold the power (side) and the volume down button together until the Apple logo appears.

For iPhone 8 and newer: Press and release the volume up button, press and hold the volume down button and then press and hold the side button until the Apple Logo appears.

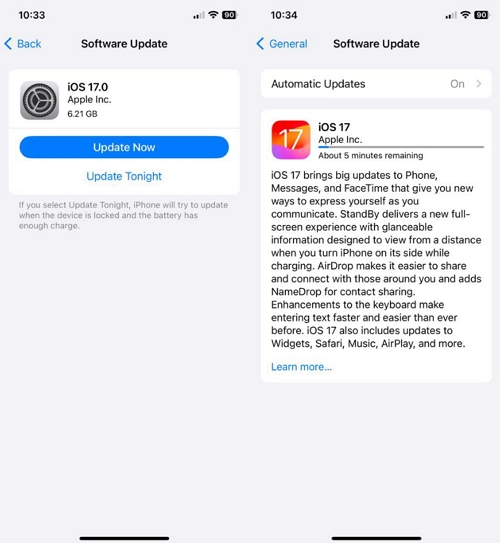
Make sure your device is running the latest iOS version by checking for a software update:
Removing and reinserting the SIM card can potentially resolve the issue:

If a force restart and the above solutions don't help, try using TinyFix, an iOS system repair tool. This tool can fix various iOS issues including an iPhone stuck on black screen, Apple logo, the Emergency SOS screen, etc. without data loss.
The following are the simple steps to repair your iPhone using TinyFix:
Step 1: Start by downloading and installing the program on to your computer.
Step 2: Launch TinyFix and then connect the iPhone 11 to the computer using USB/lightning cable. In the main window, choose "iOS System Repair."

Step 3: Select "Standard Repair Mode" to fix the device without affecting the data on it.

Step 4: In the next screen, you will be prompted to download the latest firmware package. Click on "Download" to begin downloading the package.

Step 5: When the download is complete, click on "Fix Now" to start fixing the device. Keep the device connected to the computer until the process is complete and the iPhone restarts in normal mode.

Restoring your device via iTunes or Finder can also resolve this issue but will erase all data. Ensure you have a recent backup. Here's how:
Step 1: Open iTunes or Finder on your computer and take a moment to make sure that the version of iTunes or Finder on your computer is the latest. Use the device's lightning/USB cable to connect the device to the computer.
Step 2: iTunes or Finder should be able to detect the connected iPhone. Click on it when it appears in the top-left corner of the screen.
Step 3: Click on "Summary" and then select "Restore iPhone." Confirm that you want to restore the device and keep it connected to the computer until the restore is complete and the iPhone restarts.

If a simple restore doesn't work, try putting your device in recovery mode to reinstall iOS. This method will also erase all data.
Follow these steps to reinstall the iOS on your device by restoring it in recovery mode:
Step 1: Connect the iPhone to the computer and open iTunes or Finder. Ensure that the version of iTunes you have is up to date to avoid any iTunes errors.
Step 2: With your iPhone connected to the computer, use the following combination of buttons to put the device in recovery mode:

Step 3: You will be promoted to either "Update" or "Restore" the iPhone. Click "Update" and iTunes or Finder will attempt to update the device without deleting any data.
If the update doesn't work, repeat the process and choose "Restore" instead to restore the device to its factory settings. Keep the device connected to the computer until the process is complete.

The whole process will take about 15 minutes. If it takes more than 15 minutes, the device may exit recovery mode and you will need to repeat step 2 above.
The most effective solutions to resolve the device stuck on the Emergency SOS screen is to check your cellular network settings and contact your carrier. If this won't work, try to restore the device either using iTunes, Finder or TinyFix iOS System Repair tool.

Mako is a technical writer with a passion for all things tech. Whether you're wondering about how to fix your iPhone or Android device or trying to get something to work in your settings, Mako is your go-to for professional help. He loves writing, testing solutions, and most of all, making sure his research is factually accurate.