 by J. Robertson Macaulay D. Young
Updated On Apr 10, 2024
Published On May 23, 2023
Basic iPhone Tips Ideal for Newbies
by J. Robertson Macaulay D. Young
Updated On Apr 10, 2024
Published On May 23, 2023
Basic iPhone Tips Ideal for Newbies
Many companies and schools may set up MDM for devices to facilitate management and privacy protection. However, once you've left the organization, using a device with MDM restrictions can be challenging. Here, we will show you how to remove Jumpcloud MDM from your iPhone or MacBook.
Jumpcloud Mobile Device Management (MDM) is specialized software for centralized management of endpoints within an enterprise, including laptops, smartphones, and tablets. As employees increasingly rely on mobile devices for work tasks, organizations adopt MDM solutions to enhance data security and productivity.
Similarly, educational institutions incorporate mobile devices into teaching and learning strategies. However, managing these devices and ensuring their educational use can be challenging. Many schools use Jumpcloud MDM to manage multiple students' devices, restricting app downloads, managing connectivity, setting passwords, and more, to prevent non-educational use.
If you find that you no longer need Jumpcloud services or encounter restrictions affecting your device's functionality, it becomes necessary to remove Jumpcloud MDM from your device. In the following section, we will outline three methods for removing Jumpcloud MDM.
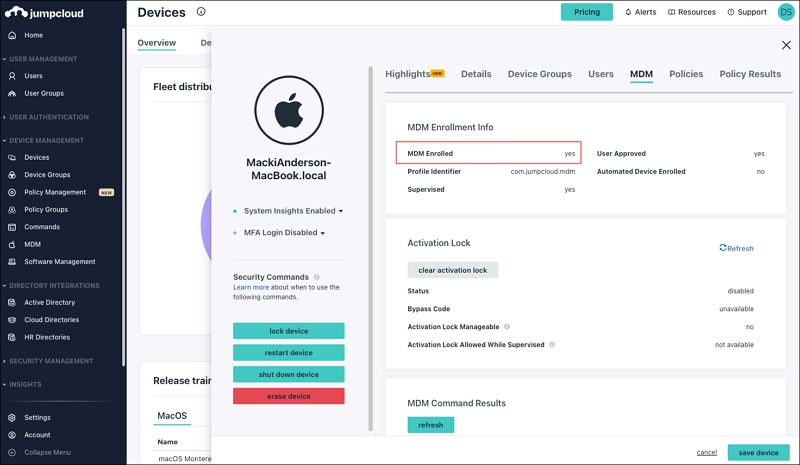
If you can contact the administrator who enrolled your device with Jumpcloud or have access to the Jumpcloud Admin Portal, you can easily remove the MDM from your device. The process is simple; just follow these steps:
Step 1: Go to the Admin Portal at https://console.jumpcloud.com and log in.
Step 2: Choose "Device Management" and then select "Devices" from the drop-down menu.
Step 3: Locate the device you want to stop managing and ensure it has an "Active, System Reporting" status.
Step 4: Click on the device and then choose "Delete" to uninstall all Jumpcloud components associated with the device.
If you're unable to contact the administrator and need to remove Jumpcloud from your device, you can rely on MDM bypass tools to help you bypass the restriction on your device.
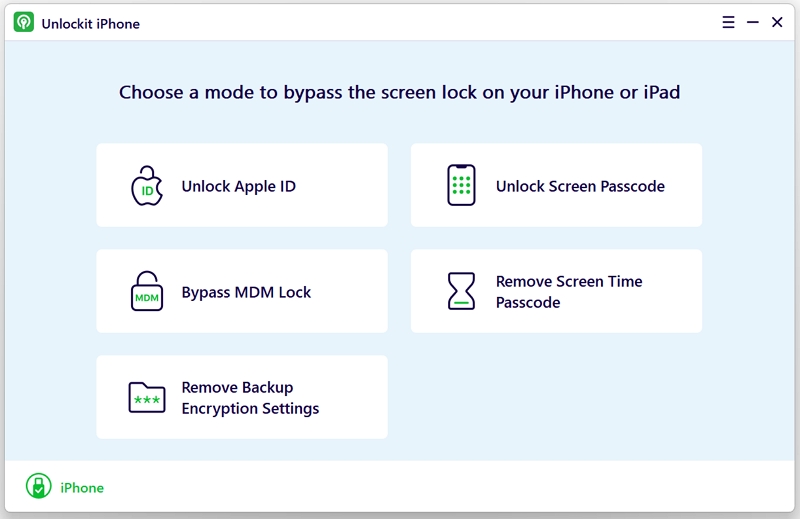
Unlockit iPhone, is a user-friendly and professional MDM bypass software that can quickly and effectively remove Jumpcloud MDM from your iPhone without requiring a password, giving you the freedom to access the device, download apps, and modify settings as you please.
Moreover, it's incredibly easy to use and doesn't require you to enter a username or password, making MDM profile removal without data loss possible.
Here's how it works;
Step 1: Download and install Unlockit iPhone on your computer.
Step 2: Open the software and click on "Remove MDM Lock."
Step 3: Connect your iPhone to your computer using a USB cable.
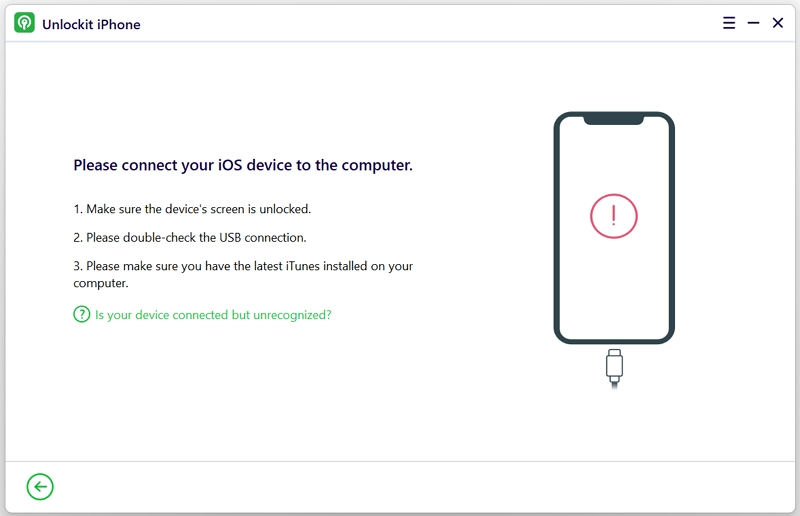
Step 4: Click "Start" and allow Unlockit iPhone a few minutes to remove the MDM.


If you're looking to remove MDM from an Apple MacBook Pro or Air, one of the best solutions is iRemove Software. Once installed, it will bypass MDM in just a few minutes. But before you install the program, follow these steps to prepare the device:
Step 1: Start your Mac in Recovery Mode. If you have an M1 silicon CPU, turn on your Mac and hold the power button until you see the startup options window. If you have an Intel CPU, press and hold the Command (⌘)-R keys after pressing the power button or restarting your Mac.
Step 2: In Recovery Mode, open Disk Utility and follow the official guide to erase and reformat the storage device: https://support.apple.com/en-gb/guide/disk-utility/dskutl14079/mac.
Step 3: Once the erasing process is complete, start reinstalling macOS by following this guide: https://support.apple.com/en-us/HT204904.
Step 4: During the installation process, your Mac will restart with the Apple logo and progress bar. To prevent your Mac from auto-connecting to the internet, turn off your router.
Step 5: After completing the macOS installation, set up your device without connecting to Wi-Fi. At the 'Select a Wi-Fi network' step, click the 'Other network settings' link and select the 'My Mac computer does not connect to the internet' option. Finish the setup.
Step 6: The final step is to disable SIP options on your macOS device. To do this, start your Mac in Recovery Mode (complete step 1), open Terminal from the "Utilities" menu, and enter the command: [-bash-3.2# csrutil disable]. Your laptop will restart.
Once the preparation is complete, you'll be ready to install the iRemove MDM removal tool on your computer. After installation, open iRemove and click "Start." Wait for the program to check your device's compatibility, and then it will begin to disable MDM immediately.
If you discover that your device is restricted by Jumpcloud MDM, there are several ways to bypass these restrictions. Whether through direct access to the Jumpcloud Admin Portal or the utilization of bypass tools, you can regain control over your device. By following the appropriate steps outlined in this guide, you can effectively remove Jumpcloud MDM and restore full autonomy to your devices.

Mako is a technical writer with a passion for all things tech. Whether you're wondering about how to fix your iPhone or Android device or trying to get something to work in your settings, Mako is your go-to for professional help. He loves writing, testing solutions, and most of all, making sure his research is factually accurate.